20.2. Adding a new event
Choose the New button.
You see the Edit Event dialog box.
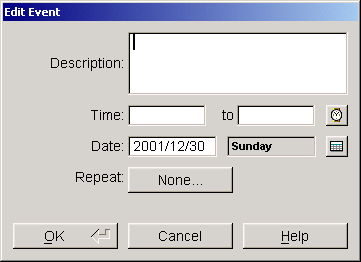
Enter a description of this event in the Description field.
Enter the starting and ending times for the event in the Time fields. You can also choose the clock button to set the time from the Edit Appointment Times dialog box.
In the Edit Appointment Times dialog box, choose the starting and ending times by choosing the times you want from the hour and minute menus.
Enter the date of the event in the Date field. You can also choose the calendar button to choose a date from the Select Date dialog box.

If the event will repeat on a regular basis, tap the Repeat button. You see the Change Repeat dialog box.
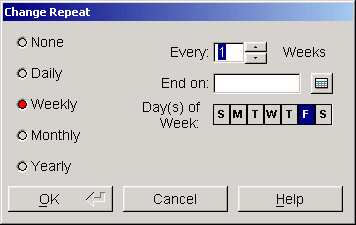
Choose the repetition frequency from the radio buttons, None, Daily, Weekly, Monthly, and Yearly.
Set the how often to repeat the event by entering a number in the Every field. For example, to have an event occur every other month, choose Monthly and enter "2" in the Every field.
You can set and end date after which the events will no longer occur by entering that date in the End on field. You can also choose the calendar button to select a date from the Select Date dialog box.
For weekly events, you can choose the days of the week on which this event will occur. Highlight the days of the week on which you want to schedule the event.
For monthly events, you can choose whether the events occur on the same day each month or on the same date each month. From the By menu, choose Day or Date.
When you have set all the schedule information, choose OK to set the event in your schedule.